Wednesday, February 15, 2012

Kindle Case Tutorial

When you have a 1 year old running around your house, none of your possessions are safe. Charlie loves to play with anything that belongs to mommy or daddy, our phones, keys, wallets and computers. I probably spend about 50% of my day making sure he isn't getting into something he isn't supposed to.
A few days ago I caught Charlie playing with the kindle touch I bought my husband this last Christmas. He moved a chair close enough to our bed to climb on then got the kindle off of our dresser which is right next to our bed. After realizing how easily he could have just dropped the kindle on the floor and broken it, I decided it was time to buy it a case.
I looked at Wal-Mart and found nothing. They had cases for iPads and other electronics but nothing for the Kindle. I looked online and found a few cases that I liked but I didn't really want to spend a ton of money for just a case. So I looked through my plethora of crafting materials and came up with a plan.

I used...
1 Kids craft foam sheet
Elastic
Material
1 Button
1 Thin elastic hair band

1) Cut 8x11 inches of the foam

2) Cut 9x24 inches of the material
(If you are cutting your fabric on the fold cut 9x12)

3) Fold the material in half (good sides facing each other)
then put the foam in between it.

4) Sew the fabric around the foam and leave a 4-6 
inch hole so you can invert the fabric in a later step.
Make sure you don't sew over the foam!

5) Cut off the extra fabric except the fabric around the hole.
You want to leave the extra fabric there so that you tuck it in
and sew it down when the time comes. It should look like this.

6) Pull the foam out.

7) Turn your fabric right sides out. It should look like this.

8) Put your foam back in, fold under the extra fabric and pin down.

9) Sew a top stitch all the way around the case.

10) Find the center of you case and sew a straight line from
top to bottom. This will be where your case folds.
(Click the image to see it full sized with measurements)  
11) Add the Elastic. Measure 2 3/4 in. from the side, 

1 in. from the bottom and mark with a pencil. 
Then measure 3/4 in. from the side and 2 1/2 in. 
from the bottom corner and mark it. 
Do the same thing for both the top and the bottom .


12) Add the elastic hair band vertically centered of the
back side of the case and the button to the front side.
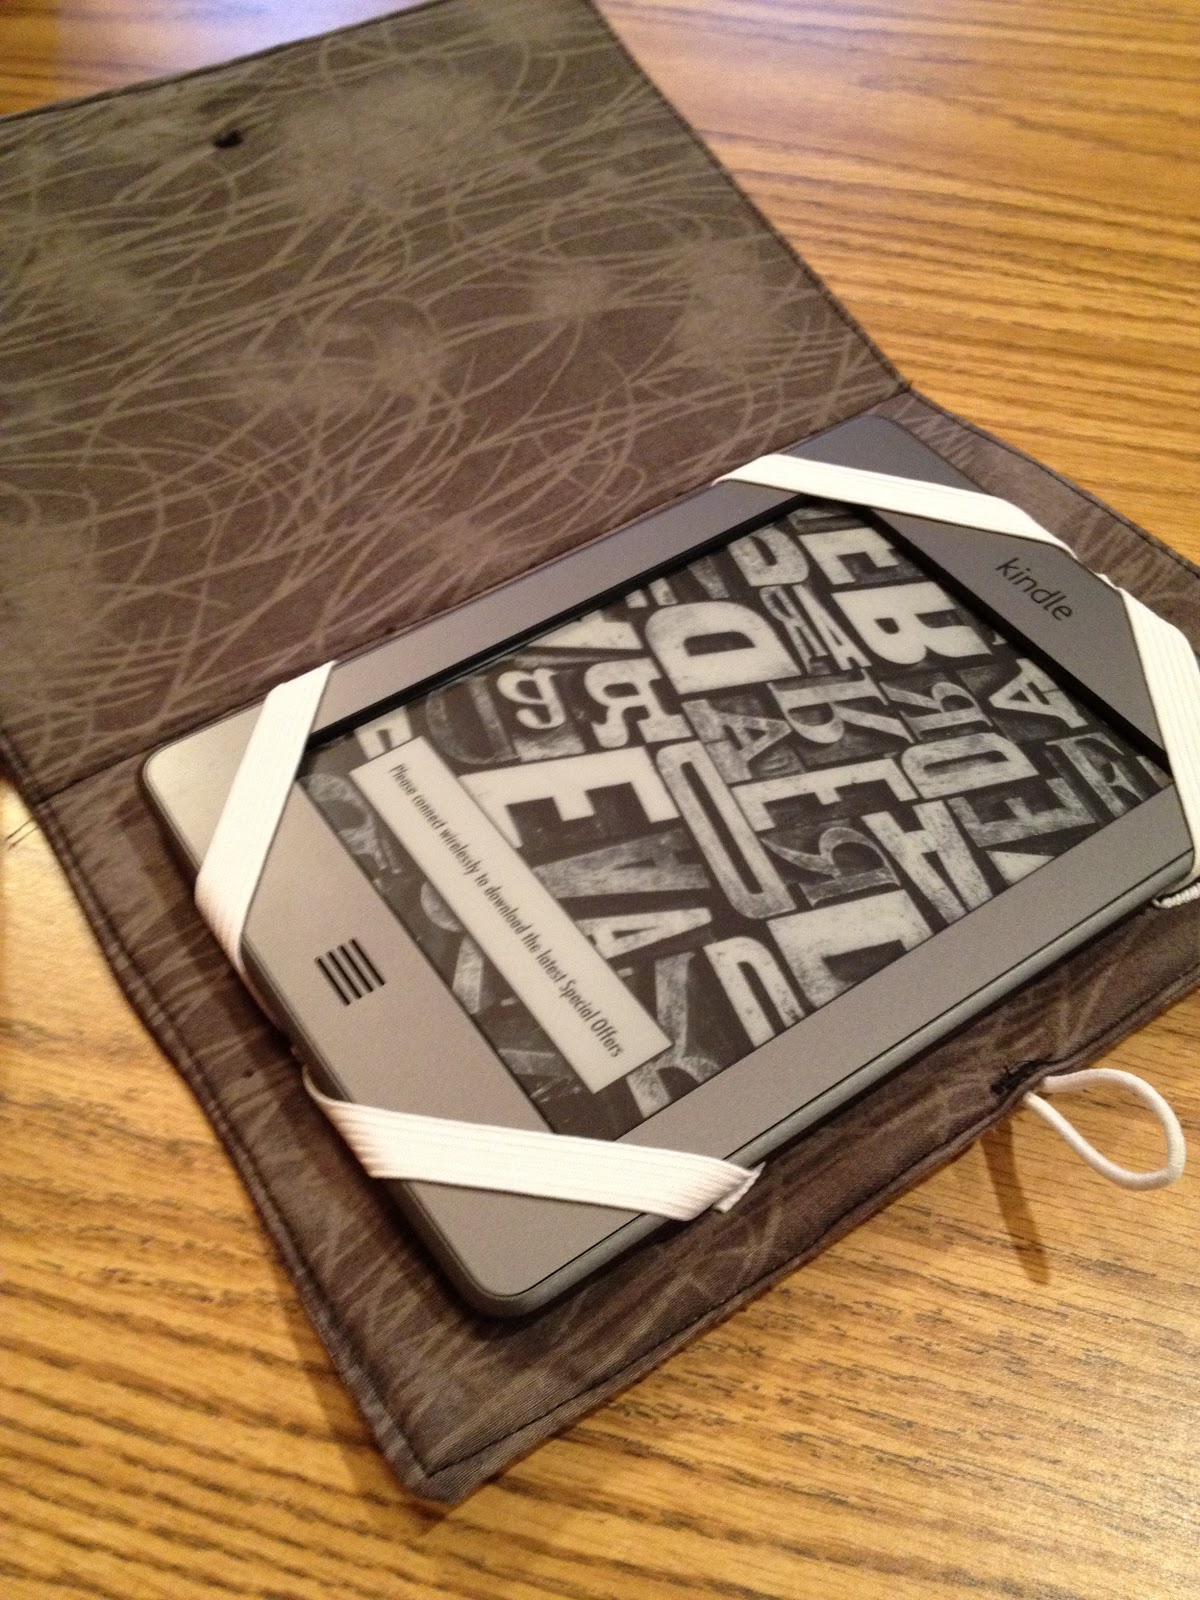
Here it is!


Thanks for reading!

Monday, February 13, 2012

Baby Skirts!

The past couple of days I have been looking through my fabric and extra craft stuff, trying to get some inspiration for a new project. I had some remnants from a project that I finished a week ago and there was just enough to make a skirt for my new baby. 
I didn't have a patter so I just made some thing really simple.
First I cut out a piece of fabric 32 in x 8 in, then  I used remnants of fold over elastic from one of my other projects. Since I don't have a baby to measure to make sure I am making this skirt the right size, I took one of the 0-3 month outfits I recently purchased and measured around the waist band of the pants. I ended up using about 17 inches of  Fold over elastic. Just to be sure that was the right size, I did a search online  for baby waist sizes and found a baby sizing chart.
Put the material wrong sides together and match up the ends that are 8 inches long then sew. Flip it right side out (you should have a tube). Next sew on the fold over elastic, you have to pull the elastic tight while sewing to get it all the way around the skirt, which can be a little tricky. I usually tack down about half a centimeter of the elastic before I start pulling it tight so that it is anchored down to the material. Once the elastic is on, hem up the bottom and your done!
Fold Over Elastic

I made some flowers on just for fun

I love the way this turned out

Each skirt took about 20-30 minutes


Thanks for reading!

Sunday, February 5, 2012

Ceramic Painting

My little sisters love anime and manga, so for fun my husband and I painted some mugs as a gift for them. Just so you know, I am not a painter or an artists so the mug I painted didn't turn out as nice as I would have liked. I figured I would show them to you anyway.
I bought some ceramic paint for $3.00 at Hobby Lobby, a paint brush set from Wal-Mart for about $4.00 and 2 mugs from the Dollar Tree.
I printed out a few images to use as an outline for my cup, then I practiced drawing them on paper. After practicing for a while I used a pencil to draw out the images onto the mug (this was very hard to do because the pencil kept rubbing off). Then I painted over the pencil outline and let it dry.  It took me a while to finish but that's because I had to paint one layer, let it dry, then paint another one, to get it to look right.
This is my finished product!
My Neighbor Totoro! 


 This is the mug my husband painted, he finished it in about three hours.
Ichigo from Bleach

Naruto!

Vash from Trigun.
I still haven't cooked them to keep the paint from coming off, but I hope to get that done sometime this week. I just hope that I can do it without totally messing up all of our hard work. Wish me luck!

Thanks for reading!