Showing posts with label Revamp. Show all posts

Monday, August 5, 2013

Recovering Fabric Baskets

I found these bins at the thrift shop for two bucks each but one of them was ripped and the fabric was not washable. Can someone please tell my why they would use fabric you can't wash?! The people who made these things must not have kids.

The bins have a metal frame and Velcro so you can take the fabric cover off to spot clean.


Here is one of the bigger holes

They Velcro onto the metal frame so they can be taken off
and cleaned

Alice was my big helper
The First thing I did was take out all of the Velcro
so I could reuse it in the new basket


:)
My kids love to help with projects


Then I took the whole thing apart with the seem ripper, it took me a really long time and the fabric kept ripping apart. At the very bottom of the bin there was a piece of cardboard sandwiched in between two pieces of fabric, I used the seam ripper to take open up one end and pulled out the card board so I could use it in the new basket covering.

Keep the Cardboard


Cut out one of each piece

For the bottom piece make sure you cut out an
extra strip o fabric about 2 inches wide
Since I want to be able to wash this I am making an opening at the bottom of the bin so that I can slip the cardboard out and just throw the rest into the washer.
 I surged one edge of the bottom fabric and then the strip then I put them good sides together and placed the cardboard on top and measured how big the opening needed to be.
Then I surged from the corner to the orange dot, about 1/2 an
inch on each side of the fabric.
This is what it looks like up close
Next sew both of the bottom pieces bad sides together
then slide the cardboard in to make sure it fits


Next I sewed on each of the sides to the bottom piece then surged
each of the sides together and around the top.

Sew the Velcro back on, slip it onto the metal frame
and your
DONE!


The new basket was tested and approved by Alice!
Thanks For reading

Wednesday, April 20, 2011

Revamping Chairs

I have these old chairs that Gordon and I bought just after we were married and they are kind of ugly looking so I decided to revamp them.

It was really easy and only took about an a hour.

Have you reupholstered your chairs? Tell me about it in the comments below!


Original (ugly) Chair
 First I unscrewed the padding on the chairs. Then I pulled off the staples and plastic.

Padding stapled on the bottom
Next I measured out the pieces of material and I left about 2 inches of extra around the edges. Since I didn't have a staler, I used a hot glue gun to attach the fabric.

Hot glue solves all problems!
 After I finished the gluing process, I cut off the excess fabric. Here is one of the finished pieces. Once I finished both parts of the chair I screwed them back in and...

The new seat
This is what it looks like when it is all finished! What an improvement over that ugly chair from before!

Our reupholstered chair

Sunday, April 17, 2011

Homemade Baby Clothes

Charlie has been growing out of his clothes so fast lately and I thought it might be fun to make some for him. Last night after he went to bed, I took this...
Old T-Shirt


And turned it into this:

New Baby Clothes!

Friday, April 15, 2011

Diaper Basket Make Over

I recently bought this cute little basket from Wal-Mart to hold Charlie's diapers and wipes in and I decided it needed a little make over.

I was going to have just the one color fabric, but decided after adding it that it wasn't quite enough so I added a ribbon. That definitely made the difference.

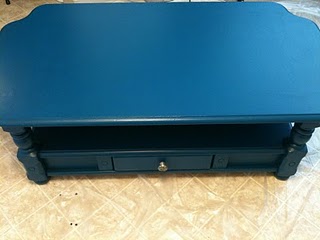
Now instead of my plain old basket I have a beautiful NEW one that also matches my new coffee table!


Before any changes


With just one fabric

My new diaper basket!

Revamping the Coffee Table

A few months ago my wonderful sister in-law gave us a coffee table for our living room :) I decided to revamp it and add some color.

First we cleaned the table really well. (There were cracks around the table that things get stuck in all the time and it drives me crazy!)

 Next we used a wood filler to fix the scratches, dents and fill in the cracks on the table and let that dry. Then we sanded it down, gave it a few coats of paint and......
VIOLA!!!


Before revamp
Our new coffee table!