Saturday, January 11, 2014

3T Pants Pattern

I have been working a little at pattern making lately and let me tell you it can be really fun and really frustrating at times. I have made a few dresses for Alice and a some pants for Charlie. I have the pattern here in jpg form for 3T Pants if you would like to try it out.


 The first thing you are going to do is cut out each piece of the pattern and tape them together. 

I used a pair of my husbands old pants as the material for these pants but you could use what ever kind of fabric you want. 
First I laid my husbands pants out flat on the floor, since there was a hole in them I had to be careful about the placement of the pattern. I cut the pattern pieces out of each leg of the pants and ended up with four pieces total at the end.


 I cut the first pieces out with the pattern facing right sides up then flipped the pattern right sides down for the other leg. 

Seem allowance is added into the pattern 


Here are all four pieces after they have been cut out.

Put your fabric right sides together and sew down the red dotted line on each leg of the pants.
Then you are going to sew the green line on each pant leg, by this time you should have two tube looking things. Next you are going to line up the the crotch seems of both of the tubes (that is the yellow dotted lines) and sew them together. I matched together the red seem of the tubes first and pinned then worked my way up the front of the pants pinning together and then the back. 
Once that is done you hem the bottom of each leg and around the top of the pants. I folded the fabric down about an inch for the elastic around the top of the pants and sewed all the way around leaving a two inch hole so that I could feel the elastic through.
I measured around my sons waits to get the length I would need for the elastic. Mark your elastic so you know where to sew it together, then match up the lines and sew together. 
Feed the elastic through with a safety pin.


Match up your lines and pin your elastic together.

Then sew it together. I usually sew a square
on the elastic to make sure that it won't come apart.
 
Cut off the extra elastic and pull the pants around the elastic band so that stuff that you've just sewn will go into the fabric casing. Try the pants on your child to make sure the waist fits right, if it does sew up the last two inches of the band around the top. If it doesn't fit right you can adjust it.
Here is what the finished product looks like.


Charlie did Not want to take pictures so I tried to
bribe him with fruit snacks.... it didn't work.


"NOO MOMMY put it away a CAMERA!!"

"Stop! NOO!"

I don't know why he has become so camera shy all of a sudden. I just hop he lets me get better pictures next time. Thanks for reading!

Monday, September 16, 2013

Robot Mittens

I try to make a lot of the gifts I give out for Christmas and birthdays, it's usually budget friendly and I feel like it's a little better than giving a gift card. Now don't get me wrong, I love getting money for a gift, who doesn't? But I also enjoy gifts that are unique and have had some time put into them.  .

Last year I waited until a month or two before Christmas to start making our gifts and almost didn't finish making everything, I figured it would be smart to start a little early this year. It's no fun when your stressing out a week before Christmas because you have so much to get done. The holidays are more enjoyable when they are stress free, don't ya think?

While looking for things to make Charlie I came across this wonderful mitten pattern and I crochet him some mittens. The pattern is well written and I was able to get the gloves done really quick. The pattern can also be used to make gloves for older kids and adults too. After looking at the mittens I felt like they could use a little more protection. I don't know if you've ever played in the snow with crochet gloves but after a few minutes the snow starts to seep through the gloves and your hands get cold really quick. If there is snow outside it is inevitable that Charlie will be in it. So I needed to come up with a way to keep the snow from getting through right away.


I found some felt in my craft room and came up with a robot that I could sew onto the gloves. It will give Charlie's hands a little more protection from the cold and it looks cute to boot! I made a printable robot pattern and a simple oval pattern that you could put on the gloves instead of the robot if your looking for something quick.

The materials I used where
-Yarn
-Crochet needle
-Scissors
-Needle
-Thread
-Crafting felt sheets in any color you choose
-Craft glue (optional)

Step one! Crochet your gloves. 

Step two! Cut out your Robot!

Step three! Sew the eyes to the Robots head and the hands
 to the robots arms.

Step four! Place both heads on each of the gloves
 and make sure their placement is the same. You need
to also make sure that you are putting the Robot
on to the palm of each glove. Sew them on.

Step five! Do the same thing with the body of the
 robot and sew that puppy onto your mitten.

      Step six! Sew on your arms and your done!

Notes- I used a stitch similar to a blanket stitch for this project. You want to be very careful to not go through both layers of the glove when trying to sew your applique on. 
You can use a craft glue to stick the eyes and hands in place before you start stitching but it isn't necessary.
If you would like to use a different fabric like cotton for your mittens you may want to add fusible interfacing to it so that it isn't so flimsy. It will also keep the fabric from fraying.  Double sided fusible interfacing like Heat and Bond, will not stick well to your mitten and you run the risk of melting your yarn if you try to iron it on. So if you go the interfacing route then iron it on to your fabric only and iron it before you place the pieces on your glove so you don't burn anything.


I hope you really enjoyed this tutorial. Its really simple and lots of fun, you don't even have to use a robot. Make your own applique and put it together and post a picture on the Divine Crafting Facebook Page, I would love to see what you've come up with.

Wednesday, August 7, 2013

What I've Learned About Sewing

I am not the best seamstress in the world but there are a few things I have learned that have helped me to make my sewing projects look better (or at the very least keep me from loosing my mind when something doesn't turn out right).

1. The IRON is your BEST FRIEND!

It makes things so much easier when you can iron down a hem before you sew it or iron out a piece of fabric before you cut out your pattern. It may seem like a wast of time but it really helps.

2. Take the time to thoroughly PLAN OUT YOUR PROJECT.

I know from experience this will save you a lot of headaches later. I can't remember how many times I have messed up on a project and then had to spend a ton of time ripping out seams because I didn't plan out how I was going to sew my garment together before I did it. If you are working from a pattern read it before you start doing anything. If you are making something without a pattern, sit down and write out what you are going to do, what pieces will be sewn together first, second, third and so on.

3. You can always START OVER.

If you mess up on a project don't sweat it! Everyone makes mistakes; just remember that you can always start your project over. Unless you are working with fabric they just don't make anymore....then oops.

4. Wait until your kids are asleep.

It is a lot easier to finish a project if you don't have to worry about your little one running off with your fabric or sticking their fingers in your sewing machine while you are trying to work.

5. Practice on fabric you don't care about

Don't use expensive fabric your first time around. It really stinks when you mess up and waste 50 bucks.

6. Experiment

Take some time and experiment with your sewing machine, it takes some time to get to know your sewing machine so try different stitches, mess with the tension and learn how to fix it.

7. TAKE A STEP BACK AND BREATHE.

There are many times when one of my projects just isn't turning out like I wanted it to. So I just step back and leave my project alone for a little while...take deep breaths and try not to throw my sewing machine out the window. Then reassess the project and try to fix the problem.

8. Learn to get along 

If you are new to sewing and you're anything like me you're going to be using your seam ripper a lot. Learn to get along with it, you are going to be spending a lot of time together so you might as well just be friends. Just don't leave it out or your kids may tear your couch apart.

Thanks for reading!

Monday, August 5, 2013

Recovering Fabric Baskets

I found these bins at the thrift shop for two bucks each but one of them was ripped and the fabric was not washable. Can someone please tell my why they would use fabric you can't wash?! The people who made these things must not have kids.

The bins have a metal frame and Velcro so you can take the fabric cover off to spot clean.


Here is one of the bigger holes

They Velcro onto the metal frame so they can be taken off
and cleaned

Alice was my big helper
The First thing I did was take out all of the Velcro
so I could reuse it in the new basket


:)
My kids love to help with projects


Then I took the whole thing apart with the seem ripper, it took me a really long time and the fabric kept ripping apart. At the very bottom of the bin there was a piece of cardboard sandwiched in between two pieces of fabric, I used the seam ripper to take open up one end and pulled out the card board so I could use it in the new basket covering.

Keep the Cardboard


Cut out one of each piece

For the bottom piece make sure you cut out an
extra strip o fabric about 2 inches wide
Since I want to be able to wash this I am making an opening at the bottom of the bin so that I can slip the cardboard out and just throw the rest into the washer.
 I surged one edge of the bottom fabric and then the strip then I put them good sides together and placed the cardboard on top and measured how big the opening needed to be.
Then I surged from the corner to the orange dot, about 1/2 an
inch on each side of the fabric.
This is what it looks like up close
Next sew both of the bottom pieces bad sides together
then slide the cardboard in to make sure it fits


Next I sewed on each of the sides to the bottom piece then surged
each of the sides together and around the top.

Sew the Velcro back on, slip it onto the metal frame
and your
DONE!


The new basket was tested and approved by Alice!
Thanks For reading

Thursday, June 13, 2013

Crafter's ADD or Procrastination?

Sometimes I am horrible at finishing things, just ask my husband. Lets take cleaning for instance, I will start to clean the kitchen and I notice that one of my cupboards is dirty. Instead of finishing the kitchen I will spend an hour on one cupboard. Then there are the kids to take care of and I just forget about cleaning the kitchen all together. I get sidetracked very easily and nothing in my house gets done, but hey... at least I cleaned out one of the cupboards.

I do the same thing when it comes to crafts. I will start making a dress and then find this really cool blanket pattern on Pinterest, then the dress sits in my closet for a few months because I have forgotten I was working on it. Pinterest is awesome but it will probably be the death of m... Ooh, that looks like a nice project... now where was I?

I find so many cool things on there that I want to do and I never finish any of them. I wonder if I have crafter's Attention Deficit Disorder. Does anyone know if there is medication to help with this? I guess I am just going to have to rein myself in and finish one project before I start another one. Did I mention I spent a few days last month cleaning my craft room? There are so many unfinished projects sitting in there that I could probably fill my car with them. I have at least 3 unfinished quilts sitting in a box and I also found a baby cocoon I started making when I found out I was pregnant with Alice. (By the way... Alice is 14 months old now)

Well I better go finish that dress... or clean.

Thanks for reading.


Sunday, April 7, 2013

Making a Baby Dress out of an Old Shirt


        When I was a kid I remember my Mom sewing me clothes because it was just so expensive to buy clothes for all five of us kids. Its funny how things have changed. I can go to the store and buy my daughter a dress for ten dollars or I can go to Hobby Lobby and spend eight dollars on a yard of fabric, two dollars on a zipper, one dollar on a dress pattern (if its not on sale I would spent 4-10 bucks) and then go home and spend a few hours making the dress. Sometimes it just isn't practical to sew when you can buy it already made. But If you get creative you can make things for relatively cheap. Look around your house and reuse things that you would normally just give to good will. Re-purposing things sometimes forces me to be a little more creative. Even though making things sometimes ends up being a little pricey and time consuming, I really enjoy it. In some ways, sewing has become my therapy. When I have had an absolutely horrible day where nothing has gone the way I planned. When I've spent all day trying to keep Alice from climbing on everything or when I have to scrub Charlies artwork off of the walls, crafting is my escape from the stress.


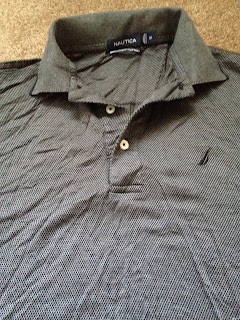
This week I was looking through a pile of old clothes that I keep with the intent that I may use them in a project some day, and I found a shirt that my Husband refuses to wear because he HATES to wear anything with a collar. At his last job they had a strict dress code and we bough him a bunch of polo shirts out of necessity. If he had a choice he would have gone to work every day in flip flops a t-shirt and shorts. Now that he has a choice as to what he can wear to work, he wears a t-shirt everyday. And I have a plethora of polo and button up shirts that he refuses to wear (even though he looks amazing in them). I couldn't just throw away all of these shirts (I am a pack rat) so I have saved them until I found something that I really wanted to make.

I figured I would make Alice a dress and here is how I did it. 
I used my seam ripper and took apart most of the shirt, the collar, sleeves and the short band at the bottom of the sleeves were all taken apart. I saved all of the pieces because I had no idea what I was was going to need. 
Once most of the shirt was deconstructed I took the main part of the shirt cut it in half just below the buttons.


 Then I laid a dress that currently fits Alice, on the top part of the shirt and use it as an outline to measure out how big I needed to make the new dress. Then I folded the shirt in half  so that I could cut the arm holes and the sides of the dress to the size I though should work. Since I didn't have a pattern I left the shit pretty big and put it on Alice to see how much I needed to adjust the arm holes. It was really nice to  be able to test the size of the dress on her as I made it. After a little adjusting I sewed both sides of the shirt until I got to the arm holes. Then I put the shirt back on her and I realized that the neck of the dress was just too big, so I took it in a little. The way I fixed the neck required me to adjust the arm hole location again. 

Here is what the arms look like up close
Since the old collar was just too big, I took one of the arm bands and sewed it around the neck opening as a new collar. Next, I took the remaining armband and cut it in half and used each of them on the arm area to give the sleeves a finished look.  I then took the bottom half of the shirt that I cut off earlier and gathered the fabric and attached it to the top of the shirt. I didn't need to worry about hemming up the bottom of the skirt because I kept the original hem.

This was the 3rd time I tried the top on her
to see how it was fitting. After the 5th try on she
started to get really mad and run away when ever
I came near her with the dress.
I pinned the arm band around the neck as the
new collar.


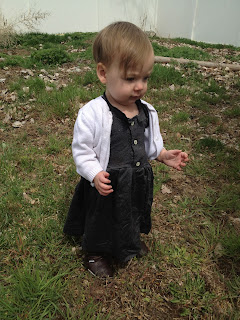
The dress is still a little too long for her, she trips over it when she climbs the stairs. I will have to shorten it a few inches. I am also working on some flowers to add to the dress so that it doesn't look so bland but I haven't had time to finish them. 

Thanks for reading!